

It started with a pair of shorts when I first began looking for belly fat exercises at home. I pulled them out of a drawer in spring, the same ones I’d worn the previous summer, and the button wouldn’t close without a fight.
I’d been working from home for about a year by then. My “commute” was twelve steps from the bedroom to a kitchen chair. My lunch break was scrolling my phone while eating leftovers. I wasn’t eating anything wild, but I’d stopped moving without realizing it, and my midsection was the one place that made it obvious.
So I did what I assume you’re doing right now. I searched for belly fat exercises I could do at home, because the gym felt like too much friction and I didn’t want to buy equipment I’d use twice.
I spent the next 10 weeks testing things. Some worked. Some were a waste of time. A couple made my lower back angry. This is what I’d tell a friend who asked me over coffee.
The part I got wrong for the first two weeks

I did what most people do. I found a “flat stomach in 14 days” video and did crunches, leg raises, and sit-ups until my abs were sore. My stomach looked exactly the same.
That’s the spot reduction myth, the idea that working a muscle burns the fat directly on top of it. Your body doesn’t work that way. When you burn fat, it comes from all over, and genetics and hormones decide the order. For a lot of people, the belly is the last stop.
Ab exercises still matter, just for different reasons. They build the muscle underneath, help your posture, protect your lower back, and make your midsection look tighter once the fat comes down. They just can’t do the fat-loss job by themselves.
The exercises that helped me most were the ones that used big muscles and got my heart rate up, plus a smaller amount of targeted core work. Once I understood that, the whole plan got simpler.
A quick note on the two kinds of belly fat
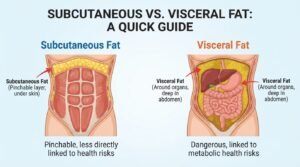
I’m not a doctor, but this changed how I thought about the goal.
There’s fat right under your skin (the pinchable kind), and there’s deeper fat around your organs, called visceral fat. The deeper kind is the one linked to health risks, and it tends to respond well to regular exercise, better sleep, and less stress, even when the scale barely moves.
That’s why I stopped obsessing over the mirror and started tracking my waist with a tape measure. Mine dropped before my weight did, and that told me something was working.
If you have health conditions, are pregnant or recently postpartum, or haven’t exercised in years, talk to your doctor before starting. It’s boring advice, but I’ve seen people skip it and regret it.
What I actually did (and what I’d do again)
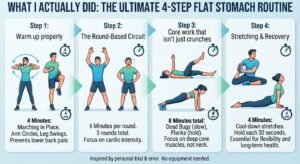
Here’s the routine I settled on after the trial and error. No equipment needed, though a yoga mat helps.
Step 1: Warm up properly:
I skipped this in week one and my lower back tightened up by day three. Now I spend about four minutes on it:
- 30 seconds of marching in place
- 10 hip circles each direction
- 10 arm circles forward and back
- 10 cat-cow stretches on the floor
- 10 slow bodyweight squats
It feels like a delay when you want to get started. It’s not, and my back hasn’t complained since.
Step 2: Do one full-body cardio-strength circuit
This is the part that moved my waistline. Do each move for 40 seconds, rest 20 seconds, and repeat the whole round 3 times.
1. Squats. Feet shoulder-width apart, sit back like there’s a chair behind you, keep your chest up.
2. Reverse lunges. Step back instead of forward. It’s kinder on the knees, which I learned the hard way.
3. Incline or knee push-ups. Hands on a countertop or sturdy couch is a good start. Nobody’s grading you.
4. Mountain climbers. Hands under your shoulders, drive your knees toward your chest at a steady pace.
5. Glute bridges. These strengthen the muscles that support your lower back. Squeeze at the top.
6. Jumping jacks, or step-out jacks. if you’d rather skip the impact (upstairs neighbors will thank you).
A round takes about 6 minutes, so three rounds is roughly 18 minutes. When I started, I could barely finish two rounds without stopping. That’s normal.
Step 3: Finish with core work (Best Belly Fat Exercises at Home)
I dropped most of the crunches and used these instead, about 6 to 8 minutes total:
- Dead bugs. Lie on your back, arms up, knees bent over your hips. Slowly lower the opposite arm and leg, then switch. Keep your lower back pressed into the floor. They look easy and they’re not.
- Forearm plank. Start with 20 to 30 seconds. Quality matters more than time, so if your hips sag, stop and rest.
- Side plank (knees down is fine). 20 seconds per side.
- Bird dogs. Slow, steady, no wobbling.
- Heel taps. Lying on your back with knees bent, alternate reaching down to tap each heel. Gentle, but you feel it.
The dead bugs changed my mind about core work. They trained the deep stabilizing muscles instead of just fatiguing the surface ones. My posture at the desk improved, and that surprised me.
Step 4: Walk, even on days you don’t work out
I resisted this one because walking doesn’t feel like a workout. But when I looked at my phone’s step count, I was averaging about 2,500 steps a day working from home. That’s almost nothing.
I added a 25-minute walk after lunch and paced during phone calls. I got up to around 7,500 steps on most days. I use the Health app on my iPhone, but Google Fit works fine too.
I can’t prove exactly how much of my progress was the walking. What I know is that the days I walked, I felt better, slept better, and snacked less in the afternoon.
My weekly schedule (the one that actually survived real life)
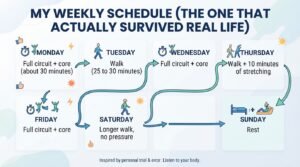
- Monday: Full circuit + core (about 30 minutes)
- Tuesday: Walk (25 to 30 minutes)
- Wednesday: Full circuit + core
- Thursday: Walk + 10 minutes of stretching
- Friday: Full circuit + core
- Saturday: Longer walk, no pressure
- Sunday: Rest
If you’re starting from zero, do the circuit twice a week for the first two weeks, then build up. I’d rather you stick with a smaller plan than burn out on an ambitious one. I did the ambitious version first, and it lasted nine days.
The apps and tools I used (and what I skipped)
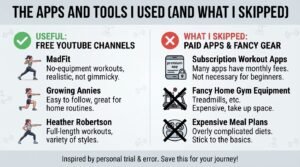
Useful:
- YouTube. MadFit, Growing Annie, and Heather Robertson all have no-equipment workouts that feel realistic and not gimmicky. Search their channels instead of falling for random clickbait titles.
- Nike Training Club. The free content covers bodyweight workouts, and following a guided session helped when I didn’t want to plan anything.
- Apple Fitness+. If you already have an Apple Watch, it’s a solid option, though it’s a paid subscription so I’d try free stuff first.
- A tape measure. The cheapest and most honest tool. I measured around my navel once every two weeks, same time of day, same spot.
- (I used Seconds Pro, but plenty of free ones exist). Timed rounds kept me from cutting rests short or dragging them out.
Not worth it:
- Waist trainers. I tried one for a week. It made me sweat and made sitting uncomfortable. Sweating there isn’t fat loss.
- Ab rollers. I bought one, used it three times, and my lower back complained. Maybe they’re great once you’re stronger, but I wasn’t ready.
- Fat burning” teas. I tried one for about ten days. The only thing it burned was my time, and it made me run to the bathroom. Nothing changed on the tape measure.
Food: the awkward truth I kept avoiding

I didn’t want to write this section. I wanted the exercises to do everything. But it turned out that when I paid no attention to food, my progress stalled around week four.
I didn’t go on a strict diet. I did three simple things:
1. Tracked what I ate for one week using MyFitnessPal’s free version, just to see. The results were humbling. I was snacking constantly while working.
2. Added protein to each meal (eggs, Greek yogurt, chicken, lentils) because I felt fuller.
3. Moved snacks out of arm’s reach of my desk. Same food, less mindless grabbing.
After a week I stopped logging, since I didn’t want to track everything forever. But that one week of awareness was worth it.
Real example: how my brother-in-law tried it differently
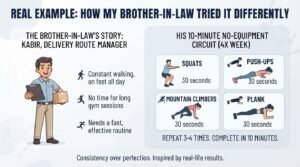
My brother-in-law Kabir is a delivery-route manager who’s on his feet a lot but has almost no time for workouts. He didn’t do the full circuit. He did a 10-minute version four times a week: squats, push-ups, mountain climbers, and a plank, repeated twice. He also stopped drinking soda with dinner.
After about three months he said his belt notch moved over a hole, and he had noticeably more energy. It wasn’t dramatic, but it was steady. What I took from his experience is that a small, repeatable plan beats a perfect one you can’t keep up.
Mistakes I made (learn from my sore back)
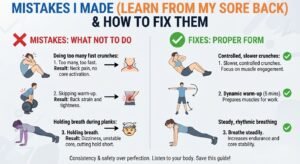
- Doing too many crunches too fast. The first week, I did hundreds. My neck hurt and my belly didn’t budge.
- Skipping the warm-up. I already mentioned my back. Lesson learned.
- Holding my breath during planks. I didn’t notice until a video pointed it out. Breathe steadily, or you’ll get dizzy and cut the hold short.
- Comparing my day 10 to someone else’s year 3. Fitness content online is filtered, lit, and often edited. I felt worse until I stopped watching transformation videos.
- Weighing myself every morning. The scale bounced around by two or three pounds from salt, water, and sleep. I switched to measuring my waist every two weeks and weighing once a week.Skipping rest days. By week three I was sore and irritable. Rest days are part of the plan, not a break from it.
- Going all-in on fasted workouts. I tried them because someone said they burn more fat. I felt shaky and quit halfway through. If you like exercising before eating, fine, but it’s not required.
What results looked like for me
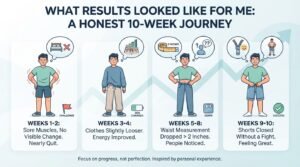 I don’t want to oversell this, so here’s the honest version over about 10 weeks:
- Weeks 1 to 2: Sore muscles, no visible change. I nearly quit.
- Weeks 3 to 4: Clothes felt slightly looser. Energy improved.
- Weeks 5 to 8: My waist measurement dropped a little over 2 inches, and people asked if I’d lost weight.
- Weeks 9 to 10: The shorts closed without a fight.
Your timeline will differ. Age, sleep, stress, hormones, and starting point all matter, and I’d be lying if I promised a specific number.
A simple 4-week starter plan
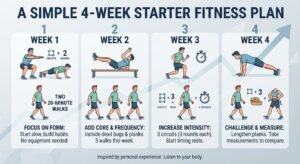
Week 1: Two circuit sessions (2 rounds each), three 20-minute walks. Focus on form.
Week 2: Three circuit sessions (2 rounds), two walks, add dead bugs and planks.
Week 3: Three circuit sessions (3 rounds), two to three walks. Start timing your rests.
Week 4: Same as week 3, but lengthen your plank holds or add a few reps. Take your measurements and compare them to day one.
Then keep going, adjust what feels off, and keep the parts you enjoy.
FAQs
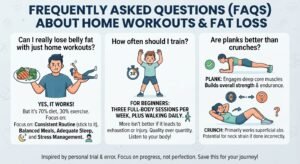
Can I really lose belly fat with just home workouts?
Exercise helps, but fat loss also depends on eating habits, sleep, and stress. Home workouts are a solid base, especially when you build a routine you can stick to.
How often should I train?
Three full sessions a week plus walking is plenty for most beginners. More isn’t better if it leaves you exhausted or injured. Quality over quantity, and staying active throughout the week aligns with professional health guidelines.
Are planks better than crunches?
They train different things. Planks build stability and endurance, and crunches work the front abs more directly. I use planks, dead bugs, and bird dogs more often because they’re easier on my neck and back.
Why is belly fat so stubborn?
Where your body stores and releases fat is influenced by genetics, hormones, age, and stress levels. For many people the belly is simply the last place it comes off. That’s frustrating but common.
Do I need weights?
Not to start. If bodyweight moves get easy, a pair of dumbbells or a resistance band is a cheap next step.
Is it safe if I have back problems?
It depends on the issue. I’d check with a doctor or physical therapist first. Moves like dead bugs and bird dogs are often gentler than sit-ups, but that’s not a guarantee for everyone.
What if I’m postpartum?
Ask your doctor about diastasis recti before doing planks or crunches, and get medical clearance first. Walking and gentle core breathing are common starting points.
How long until I see a difference?
For me, small changes came around week 3 or 4 and clearer ones around week 8. Some people see it sooner, others later. Measure your waist instead of judging by mood or mirror.
Where I ended up
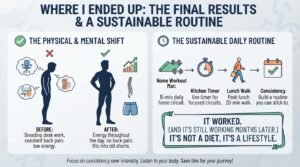
Those shorts fit again, though honestly that stopped being the point around week six. What I noticed more was that belly fat exercises at home had started working wonders, and I stopped dreading my desk chair. My back felt better, I had more energy in the afternoon, and I felt a bit less like a person who’d wandered into a routine and forgotten to leave.
The exercises matter, but the real change was building a routine that fit inside an ordinary workday. Twenty minutes, a mat, a timer, and a walk after lunch. That’s not glamorous, but it worked, and it’s still working months later.
If you start this week, keep it small and keep it boring. Do the warm-up, do the circuit, go for the walk, and measure your waist in a couple of weeks. Then decide what to change.